Linux and Amateur Radio
A few weeks ago I gave a talk at the Geelong Radio and Electronics society (http://qrz.com/VK3ANR) about the history of the Linux operating system and some the applications relate to amateur radio. In this short article, I aim to follow up on that talk and address some of the feedback I’ve received from the members by presenting some of the applications mentioned and how they can be installed.
Most of the instructions here should work for those using a Raspberry Pi, although some packages may require additional repositories in this instance. I’m personally am writing this using Linux Mint as my distribution and inspiration, although most things will transfer directly to Ubuntu and it’s many derivatives.
The slides from that presentation are available here
One of the questions I’ve been asked since the presentation is, “How do I find amateur radio applications?”/”I could only find one or two programs “. These are both very valid questions, and the answer is that the default software store somewhat fails amateurs in this instance. For instance here is a screenshot from the Linux Mint’s default package manager which is somewhat typical:
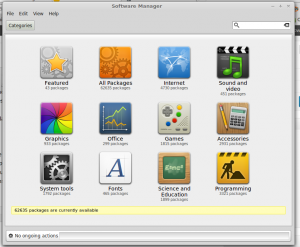
Here it isn’t obvious under which heading one would find applications suitable for use with amateur radio. One of my preferred package mangers for just browsing the list to find things is Synaptic. Synaptic is a slightly older package manager, with less graphical buttons, but for our purposes it has a distinct advantage in that it groups all (well most) amateur radio radio applications into one place. Synaptic can be install through your default package manager (the one above) or opening a terminal and entering the following command:
sudo apt-get install synaptic
Once it’s installed, it can be found under the System or Administration menus and running it will present an window like this:

In this view we have categories of the different packages listed on the left panel, with a list of packages on the right and a short description of each package listed in the panel just below that. In this view we can see that we are currently browsing the ‘Amateur Radio’ category, in which we have selected the ‘twclock’ (just off screen). Some good categories to look in are ‘Amateur Radio’ ‘Electronics’ and maybe ’Embedded Devices’ if your interested in ARM development. For our purposes there are little difference between those marked as ‘Contrib’ and ‘Non-free’, as these relate to who maintains the package and the openness of the license respectively. For instance the schematic capture software Eagle is in Electronics (non-Free) as it has a component you pay for.
To install the package of interest, click the check box to the left of the package name, and select mark for installation. That line will then turn green and the check box will be filled. If you change your mind you can simply click the check box and select ‘unmark’. This can be done for any number of packages and the packages will be installed once you click the apply button in the upper left of window.
The different color checkboxes indicate the status of a package with: not installed packages in white, installed in green, marked for installation with a tick, marked for removal in orange or red.
One thing that you can also do is search using the box in the upper right hand corner. By default this will search through all of the package names and descriptions within the selected category for the text you have entered. If you are unsure of which category the package you are after is in, then the ‘All’ category can be used to search the name and description of every available package.
Hopefully this will help people have a browse of the software that’s available for linux. Below is a short description of individual applications mentioned in the presentation and how to install them. Leave any comments or feedback below and if I get enough I’ll consider putting together a series of articles on different topics.
Individual Applications
Here I’ll list a few of the application mentioned in the talk and how to install them.
FLDIGI
Fldigi is one of the go to tools for experimenting with digital modes. It can decode everything from MORSE code to RTTY to PSK31. Installation is as simple as searching for the package fldigi in the package manager or opening a terminal and running:
sudo apt-get install fldigi
CHIRP
CHIRP is a program for programming radios, and supports a wide variety of transceivers. It can be used to for backing up the memories that are already programmed into a radio, as well as cloning them from one radio to another.
sudo apt-get install chirp
GQRX
GQRX is a software defined radio receiver that can be used with the RTL-SDR dongle and can be thought of as being functionally equivalent to SDR# or HDSDR on windows. If your running Ubuntu it can be installed by searching for the ‘gqrx-sdr’ package or running the following in a terminal:
sudo apt-get install gqrx